Roll forming is a manufacturing technique that allows fabricators to create a variety of cross sections from sheet metal. However, there are certain tolerances that roll forming machinery are able to operate within. Tolerances on part dimensions are largely dependent on the tolerances of the material being formed, end flare and springback, notwithstanding. In this post, we'll discuss roll forming machinery and material tolerances as well as distortions caused by springback and end flare.
A dimensional tolerance of ± 1/64” is commonly applied to cross-section dimensions and a tolerance of ± 1° to 2° to angles. Given a specific set of conditions, closer tolerances can be held, e.g., ± .005”. But, whenever such tolerances are specified, it should be recognized they usually represent additional tryout time, more tooling expense and possibly even the need for premium priced material that has special thickness and mechanical property controls.
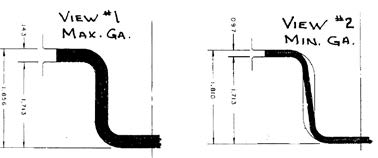
The manufacturer is often asked to propose equipment to make a given shape from more than one gauge of metal and in the interest of minimum tool cost, to do so in one (1) set of rolls. Remembering that rolls must be fitted for the maximum metal thickness and also that the only adjustment available to the operator is vertical to bring the rolls closer together or farther apart. The figure below shows the minimum and maximum conditions that exist in a typical case. Note the change in the angle of the vertical leg, the change in overall height and the change in arc length at the bends. Strip width variations also affect section tolerance. In the case of the hat section pictured here, width variation would be reflected as a variation in the length of the legs. The part designer should be governed accordingly.
The straightness of a formed section varies due to any one of several factors, strip thickness or hardness changes in a given coil, or for that matter, from coil to coil, roll pressure adjustments, lubricant or temperature changes and camber. The operator must recognize the affect of these conditions and be able to compensate for them. A straightening attachment on the exit end of every machine provides this facility.
Straightness consists actually of three (3) considerations - camber, or deviation from a straight line in a vertical plane; sweep, deviation from a straight line in a horizontal plane; and twist, the order of magnitude, for camber and sweep being about 1/8” or ¼” in about 10’ and twist about 5° to 15° in 10’.
Springback and End Flare
One of two elastic distortion phenomena that must be reckoned with by both the shape and tool designer is springback. It is defined as the general distortion of a part after its removal from the forming pressure. The amount varies with metal properties like yield point and elastic modulus. Usually by over-forming, the designer can compensate for a given set of these conditions.
Closely related is a distortion commonly known as “end flare” which occurs, as its name implies, at the ends of a roll formed section or at any point along its length one might cut though it, such as pierces or notches in the cross-section. The strains in roll forming are much more complex than in other types of bending. Residual stresses make themselves particularly apparent by a greater distortion at the ends of a part than at any point along its length. Flare can be minimized by roll design procedures, but it cannot be completely eliminated except by subjecting the metal to some amount of stretch forming or to a stress relieving anneal.

