


Whether you choose to complete laser alignment or mechanical calibration, it is imperative that you align your mill regularly in order to maintain the strict tolerances required to produce high quality product. Here are the steps you should follow in order to align your mill and keep your roll forming operations as productive as possible.
Step One: Tools Required
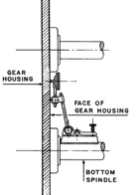
The indicators are used in a very careful manner. It is imperative that the shafts, shoulders, and machined surface of the roll form housing are clean. If the machined surface on the front of the housing is painted, the area must be cleaned to the machined surface.
Step Two: Where Am I At?

With the use of an indicator, and using the first stand as the reference stand, check each stand of the mill. The top and bottom shaft should be checked and marked on the housing the shoulder setting. This will give you an indication of where the most shims will be required for adjusting the shoulder alignment.
The final shoulder alignment for most operating conditions should be ±.003”. It is not to say that the machine and tooling could operate in worse conditions. In the event that the product being produced is considered tight tolerance, the shoulders should be set to ±.001” throughout the mill. This takes additional time and may require a final check after the mill has been run in for a shift or two.
Step Three: Setting Shoulders and Parallel
The shafts need to be paralleled first. Paralleling involves equalizing the vertical distance between each pair of spindles on the mill. Set each station at a specified center distance. By applying the surface gauge between the upper and lower spindle in each roll pass will allow you to see the if the micrometer dials require to be reset.
With the gauge in place, the vertical centers can be fine tuned by turning the adjusting screw slightly up or down. This process is repeated throughout the mill to obtain the same vertical center settings. It is important to repeat this process near the shoulder of the spindle and near the outboard-bearing sleeve to ensure the vertical setting is parallel across the length of the spindle.
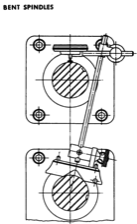
When the paralleling has been completed, it may be required to reset the micrometer dial readings on the outboard and inboard housing. To reset the dials, loosen the small setscrews and turn them both so that the arrows point to zero and retighten the setscrews. A spindle may be tested for straightness with a surface gauge while the roll stand is still on the base. If you have difficulty resetting parallel, this may be and indication that the spindle is bent. By applying the gauge to the top or bottom spindle, slowly turn the spindle a full revolution while the gauge is on the shaft.
First Roll Stand
Bottom +.005”, top .000”. Here the bottom shaft, in relation to the top, is .005” too close to the face of the housing. Therefore, take .005” of shims from the bottom rear retainer (Refer to Step 2) and move to the bottom front retainer (Refer to Step 2).
If, on the other hand, the bottom shaft had been -.005” instead of +.005”, this amount of shims would have to be taken from the front retainer of the lower spindle and moved to the rear retainer, thus matching the bottom with the top spindle alignment.
Second Roll Stand
Here the lower spindle must be pushed toward the rear by taking .004” of shims from the front lower retainer, adding the same amount to the lower rear retainer.
Third Roll Stand
The difference between -.004” and +.002” is .006”. Therefore, take .006” of shims from the rear bottom retainer and move to the front. This will make the lower -.004”, thus matching the upper.
Fourth Roll Stand
Here, the bottom spindle is exactly right (.000”), but in accordance with the rule, it should be adjusted to match the upper, which is +.004”. Therefore, take .004” of shims from the front bottom retainer, adding the same amount at the rear bottom retainer.
If you have time to do so, all lower spindle shoulders should, as indicated, be perfectly equalized with the upper. The maximum permissible difference should be .001”, because of the importance of having all upper rolls accurately centered above the lower.
Step Four: Re-Check
 Once the alignment is complete, it is important to let the mill run without any load for approximately one to two hours. Upon completing the “run-in” time, it is useful recheck each roll stand. This will ensure that all of the stands have remained the same. There have been instances when individuals have found that a retainer was not put on properly or additional shims are required to maintain the mill alignment due to bearing wear.
If you have time to do so, all lower spindle shoulders should, as indicated, be perfectly equalized with the upper. The maximum permissible difference should be .001”, because of the importance of having all upper rolls accurately centered above the lower.
Step Five: Periodic Checking
Periodic checking of stands is a good way to help determine if a problem is developing. The operator or maintenance foreman may want to check certain passes between tooling runs. For example, if there is a 16-pass forming machine, after two weeks of operation, the operator may check passes #1, #5, #9, #13, and two weeks later, check passes #2, #6, #10, #14, and so on. He is checking the passes against the original settings to see if they are changing. This manner of checking is not time consuming but effective.