How often does the everyday person take their car into the local dealership to have the tires rotated and the front-end alignment checked? Probably not as often as they should. It often takes driving on the freeway and having your car pull to one side or the other or even wearing a set of tires out to fix the problem. The point is: it takes something specific for the owner to take the vehicle into the dealer to have the alignment completed.
The same can be said for the everyday company who uses roll forming as a means for production of product. Companies typically wait until there is a problem with the product or an equipment breakdown before the time and effort is taken on preventative maintenance on the equipment.
Why is Setup Time Increasing?
One reason for poor forming may be caused by bearing wear, causing the spindles to have end play or become out of alignment. Under unfavorable operating conditions, setup or forming difficulties due to wear have been experienced within two to three months after installation of a new mill. On the other hand, under favorable conditions, mills have been know to operate for ten to twenty years without appreciable wear or adjustment of the bearings and/or shafts. The conditions depend on the operation of equipment compared to the capacities stated by the manufacturer.
Excessive wear may be caused by poor tooling setup, neglect of lubrication, or long runs of difficult stock to form. The operator should make it a rule every month, before a tooling setup, to test all roll spindles for end play. This can be done during a changeover or between stock runs. It will require the removal of the outboard housings, however; the time spent for this minor test will be well worth it in the long run.
Most top spindle retainers have a taper near the edges which allows the operator to tip the shafts whenever applicable. With this in mind, the top shafts will always move slightly more than the bottom shafts. The top shafts should have no more than 1/32” of end-play. The bottom shafts should have no more than 1/64”.
Once it has been established that there is bearing wear and the spindles need to be tightened, the next step is to determine whether the spindle shoulders are in alignment or need to be reset when the bearings are being tightened.

Materials Most Affected By Mill Alignment?
Medium to light gauge materials are affected the most by mill alignment. Aluminum and mild steel are grouped here also. For example, if the section being formed was to be made from material that is .012” thick, which is considered light gauge material and the shoulders are out of align by .003”, that equates to 25% of the material thickness. This affects the part being formed by putting additional stresses into the material which can cause straightening problems, extreme flair conditions after the part is cut off, or dimensions out of tolerance. Looking at it on a larger scope, every set of tooling becomes more difficult to set up with all these items factored in. Other signs that there may be an alignment problem are as follows:
- Double tracking of bend radii. (This could also to relate to improper tooling setup.)
- Severe scuffing on one side of the part from a particular point.
- Increased setup time on a proven roll set.
- Part forms differently on different mills.
Mill Alignment Related to SPC
SPC (Statistical Process Control) can be an operations manager’s friend or foe. With the data analyzed properly, the information provided from the SPC can indicate a problem in material, tooling wear, and even machine wear. Managers should not be quick to blame the operator setup for the poor product coming from the machine. The first place to check is the material. It is possible to have different heats of material act differently through the roll form process. However, if there is a trend to a critical dimension approaching the upper/lower end of the tolerance, there are two areas to look at first. It is possible to have a bearing malfunction in the mill causing instant problems in forming.
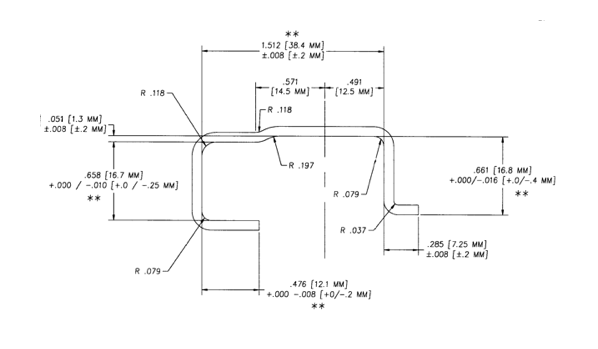
For example, below is a product which the inside dimension is critical. During the initial runs of the product, the (**) dimensions are the critical dimensions for the function of the product. If the mill is out of align by .010”, this will cause the radii to increase in size and the inside dimension to change.


